Wireless charging has been gaining the fame with users since a while now. The trend chart continues to show an increase still, a lot of smartphones including Samsung Galaxy S3 do not support this option. Though there have been announcement on Samsung’s behalf for a wireless charging kit that never really showed up in the markets as promised. Sadly, the rumors have passed on to the next release, Samsung Galaxy S4. A number of tech blogs are quite confident regarding the release of wireless charging kit with S4.
If you own an S3 and really wish to get rid of the unicorn charging setup, then you would be glad to know there is an alternative available to add wireless charging to your smartphone.
Thanks to the remarkable solution by a member of the XDA Developers forums and Palm’s wireless charging kit (Palm Pixi might ring a bell), you can now add wireless charging to your S3 in merely 10 minutes and an easy amount of $25.
Tutorial to Make Wireless Charger for Samsung Galaxy S3
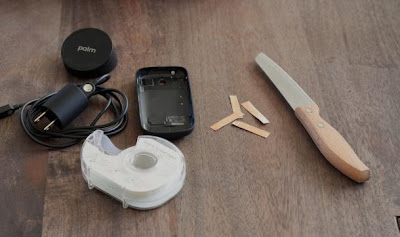
Material needed:
Palm Touchstone charging dock
Palm Pixi Touchstone back cover
Palm Pre wall adapter and USB cable (It is important that you use this specific adapter)
Copper tape (available at any hardware store)
Scotch tape
Scissors
Small knife
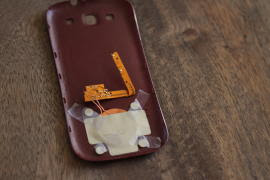
Step 1: Dismantle the Palm Pixi back cover
Begin the procedure by pulling off the lining at the back of Palm Pixi case using your fingers. Next, take the silver adhesive off. Do not throw these two items away since you will need them later in the process.
Before proceeding to the next step, get a piece of paper preferably translucent wax paper and mark all the components by placing it on top of the circuitry. Don’t forget to mark the coil and all four metal disks in their proper placements. Keep this traced layout safe.
With the aid of a knife, take the circuit board and coil off. You just took off the pieces that deal with the wireless charging of your phone. At the end, take the metal discs off and put them aside.
Step 2: Put wireless charging gears to S3
Your Palm Pixi is now totally useless if there was any use for it in the first place. Next step needs you to put the components you took out into S3’s backplate.
First, take off the backplate from your S3 smartphone and carefully place the copper coil upside down at the inner side of the backplate. Make sure the coil is placed at a distance of around ¼” from the lower end of the back cover Next, bend the L-shaped circuit board upwards so that it is able to make a contact with the smartphone.
Bring the silver adhesive you took off earlier and place it over the coil, if it doesn’t stick then use tape to keep it in place. Next position the metal discs around the coil using the template you traced out. These discs maintain contact between your phone and touchstone. Making sure everything is properly placed, tape them secure.
Step 3: Complete the circuit
Finally you need to connect your S3’s battery with the parts you just added. To achieve this, get copper tape and make four 1/8″Wx1″L strips from it.
On the two power terminals pointing outwards from the L-shaped section of the circuitry, fold a strip out of the four you prepared earlier on 1/8” of one end of a power terminal. Position the power terminal end (the one folded with copper tape) on the top power terminal and pull the rest of the tape downwards to make it reach the backplate i.e. parallel to the lower end of the backplate.
Taking another copper strip, fold the other end the same way and place it on the lower power terminal but pull and stick the tape to the edge of the backplate diagonally. Check if both the tape-folded ends are strongly pressed on the power terminals even if they don’t stick or adhere.
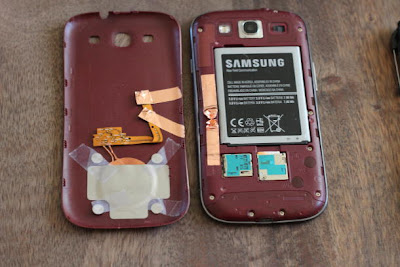
Now, take your phone and locate the power terminals on the left side of your phone battery. Repeat the step mentioned above using the remaining two copper tape strips. Place copper tape folding over one end and place the end on top of the top power terminal and place the other folded over end on the lower terminal.
Use a pencil or something of the sort to press the tape slightly into the terminals it is placed on for a better connectivity with the circuitry.
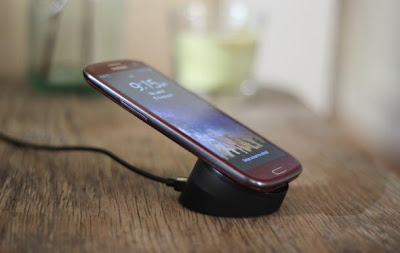
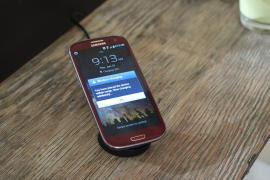
Finally, reassemble your S3 smartphone and put it on the Touchstone. You will (or at least should) receive a notification showing your device is getting charged.
Feel free to put the black lining or other such lining over the positioned parts for a final look.
In case your smartphone is still not charging, it might be due to some reasons:
An improper contact with the terminals of the copper tape. Try pressing the tape into the terminal using a pencil.
Use a pencil or something of the sort to press the tape slightly into the terminals it is placed on for a better connectivity with the circuitry.
Finally, reassemble your S3 smartphone and put it on the Touchstone. You will (or at least should) receive a notification showing your device is getting charged.
Feel free to put the black lining or other such lining over the positioned parts for a final look.
In case your smartphone is still not charging, it might be due to some reasons:
An improper contact with the terminals of the copper tape. Try pressing the tape into the terminal using a pencil.
Copper tape on the inner side of the backplate might be in contact with the tape used on the battery terminals. Use thinner strips to keep the tapes from coming into contact with nearby terminals.
The components you placed on the backplate are not properly positioned. Recheck using the same template you traced out earlier that all the components you placed are correctly positioned. Use a multimeter to check what voltage you are receiving after you have secured the copper tape over the power terminals. The voltage should be between 5.5 to 5.6 volts.
That is about it. Your phone should be charging wirelessly and at a much faster rate than when it is plugged in through a USB.