Showing posts with label Mobile. Show all posts

Thursday, August 8, 2013

Download CyanogenMod 10.2 ROM for Galaxy S4 GT-I9500

Finally, here is CyanogenMod 10.2 ROM for Samsung Galaxy S4 GT-I9500. It is not the official ROM from CM Team. But good for those who can’t wait and want to have a taste of latest Android 4.3 Jelly Bean on Galaxy S4 I9500. Most of the stuffs are working fine. Example, you can make / receive call and SMS. Wi-Fi, GPS, Bluetooth and Google applications are working. No luck on camera and sound quality for the moment. But rest assures that all these bugs will be fixed in later release. Don’t expect much from alpha build, right?


CyanogenMod ROM for Galaxy S4 I9500

CyanogenMod-ROM-Galaxy-S4-GT-I9500_02
Android 4.3

Download CyanogenMod 10.2 ROM for Galaxy S4 GT-I9500 here.


Wednesday, August 7, 2013

How To Root Samsung Galaxy Grand Duos GT-i9082


 Samsung Galaxy Grand Duos GT-i9082
Samsung Galaxy Grand has been voted as the best selling smartphone of year. It has 1.2 GHz dual-core processor, 5” screen and it runs on android jellybean. It has features of S3 as well as Note. It has dual-sim functionality along with an 8 MP camera and 2100 mAh li-ion battery. I am going to provide you the steps you require to root your Grand Duos. Once rooted; you will find that your phone is completely changed into something incredible. Before that you must know that rooting will void you manufacturer’s warranty and you solely will be responsible for whatever happens to your device.  In rare cases, your phone might be soft- brick, which could be repaired but for that you need to put some extra effort from your side. For the 1st time user, please read all the details about rooting before jumping to any conclusion.
Prerequisites before rooting Galaxy Grand Duos:
  1. USB Debugging is needed to be enabled on your phone. For this go to settings> application>  and finally click the box next to USB debugging
  2. Make sure your battery is more than 80%.
  3. You must have Samsung USB drivers in your PC.
  4. Rooting is done through ODIN. So Download ODIN and extract it to your computer.
  5. The root guide is done through CWM recovery and for that you need to download CWM_gt_i9082_droidviews.tar.md5 CWM recovery image to your computer.
  6. Download the UPDATE –SuperSU-v1.00.zip root package and place it on the root of your phone’s sd card.
Steps For Rooting Samsung Galaxy Grand Duos GT-i9082:
  1. First power down your phone and put it in download mode by pressing volume up+ home+ power button and wait till screen wakes up.
  2. Connect your phone with pc by using USB cable and open ODIN on your PC.
  3. If ID: COM section of the ODIN is yellow that means it has recognized your Grand and is ready for the work.
  4. Now click on PDA button in ODIN and choose CWM_gt_i9082_droidviews.tar.md5 you downloaded earlier in previous step.
  5. Make sure you ticked the box of “Auto Reboot” and “F.reset time”. Everything else should be unchecked.
  6. When you press the start button the flashing process will start .wait until the process is complete. Do not disconnect the phone in between.
  7. When the process is over you will get a PASS message from the ODIN and now your phone will reboot.
  8. After reboot, turn your Grand off and then press the volume up, home and power buttons simultaneously. The phone will be turned ON and the Samsung logo will blink twice after which you can let go power button but you should still keep your on volume and home buttons until a list of options come onto the screen. You will see something as ClockWorkMod recovery.
  9. Touch will be ineffective for now, press volume up to scroll up and volume down to scroll down, Home button for selection and power button to take you back to the previous settings.
  10.  Now select install zip from the SD card and find UPDATE-Super SU-v 1.00.zip on your micro SD card or internal memory.  When you are prompted to confirm, select yes.
  11. Now the rooting will start and after some time when it’s completed select the option go back and  then select reboot the system now .after rebooting,  your Grand Duos is completely rooted and you can use it now.
Now you will be able to enjoy a rooted Galaxy Grand Duos along with ClockWorkMod recovery.

Make Your Android Device Look Like iOS 7


 jbOS7 - iOS 7 like theme for Android
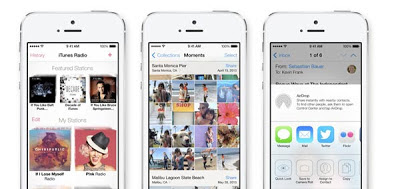
Apple iOS 7 is here with lots of clamor and bang. The new update has not created the stir as it was expected from the US giant; however it still managed to draw the eyeballs of tech geeks all over the world. While apple fans hailed this complete overhauling of the OS, the Android supporters claimed iOS 7 to be the copy of Android itself. Whatever it is, if you are an Android user and has always itched for having the feel of the Apple, you can always do that because the versatility of Android OS provides you with an opportunity to change the feel of your device without tinkering with its core functioning and lets you enjoy whatever you wished for. If you are considering changing the look of your device to iOS 7, then I assume that you must have heard about this iOS update and have gone through all its details. And for those who do not divulge much into the details, they must have been smitten by the design of the iOS 7 interface. There were lots of comparisons made between Windows and iOS phone on the OS, leaving android feel like a bit of an outcast. The developers at CNET have come up with a new theme dubbed appropriately enough, Jelly Bean OS 7. The theme comes with a slew of customizable icons that completely mimics the latest offering of the iOS that is iOS 7.This new theme gives you 3D feel but you should be holding a premium Android device as much of it depends on the hardware of your device. It works with Nova Launcher, which allows user to replace their home screens, provided their phones are using Android 4.0 or above. Although the theme cannot guarantee you a 100 % iOS 7 experience, also because even though there has been the official announcement of this update but the final version has not been unveiled and is still to come, but it does do more than just skin the home screen. As said by the developer, the theme also has a lock screen as well as well as two additional screens that acts as an app. For example, you press the weather icon and it takes you to the weather screen rather than open the weather app.
This all development and significant minute changes results in a really slick looking interface that looks a whole lot like iOS 7, while retaining the personality of the Android. And for those die- hard fans, who think that giving it a try might take them into iOS boundary completely, you need not to worry as you are just utilizing the best of your OS, its Versatility.

How To Root Samsung Galaxy S Duos S7562 & Install CWM Recovery

Samsung Galaxy S Duos S7562

Samsung Galaxy S Duos is the upgraded version of the original Galaxy S series. It has 1 GHz single core processor, 4” screen, and it runs quite smoothly on Android 4.0. It features Samsung TouchWiz UI. I am going to help you in rooting your device but before that you must know that rooting will void you of manufacturers guarantee and you solely will be responsible for whatever happens to your device.  In rare cases, your phone might be soft- brick, which could be repaired but for that you need to put some extra effort from your side. For the 1st time user, please read all the details about rooting before jumping to any conclusion. Now I am going to list down the steps for rooting:
Prerequisites before rooting Galaxy S Duos:
  • USB Debugging is needed to be enabled on your phone. For this go to settings> application>  and finally click the box next to USB debugging
  • Make sure your battery is more than 80%.
Steps For Rooting Galaxy S Duos S7562:
  • Download the Samsung Galaxy S Duos rooting kit.zip from http://d-h.st/BtL. The file contains everything you need for rooting in 12 MB package.
  • Install the driver for your Galaxy S Duos using Kies.
  • Power off your device.
  • Boot into downloading mode by pressing Volume Down + Home + Power button simultaneously until the Samsung logo appears on your device.
  • Read the Warning, press volume up to continue to downloading mode. You will have a screen written “DOWNLOADING” along with other usual stuff.
  • Connect your phone to PC.
  • Extract the rooting kit and extract and open Odin from there.
  • Odin will detect your device on the port.
  • Now on the screen appearing right in front of you tick “F. Reset Time” & “Auto reboot” option.
  • Click on PDA under the file section in Odin and browse to recovery.tar file.
  • Remove the back panel as you will be needed to remove the battery with great timing.
  • Click on start. a green bar will show you the progress made by Odin in flashing. When the bar says pass, your phone will start a reboot.
  • A while rebooting, the phone will shut down and the device will vibrate once before shutting down, you have to remove the battery and disconnect your phone from the pc.
  • Copy a file named CWM -3.1.3. zip from your rooting kit into your external or internal SD card.
  • Power off the device and boot into clockwork recovery mode by pressing volume up+ volume down + power +home button simultaneously till the Samsung logo appears followed by a CWM screen.
  • Touch will be ineffective for now, press volume up to scroll up and volume down to scroll down, Home button for selection and power button to take you back to the previous settings.
  • Select backup by scrolling down to backup and restore, make sure you have 2 GB of free space in your memory.
  • Go to install zip from the SD card option and select “choose zip from external/ internal memory card”. Select the CWM-3.1.3. zip and browse it until you get “yes” in a long list of No. select yes.
  • Now enjoy SuperUser power on your device once you reboot it.
  •  

Monday, June 24, 2013

How to perform Hard Reset on Samsung Galaxy Y


Samsung Galaxy Y Hard Reset

Warning
By performing a hard reset will delete and wipe all of your personal data, so we highly recommended to backup your important data and take the SD Card out from phone before performing hard reset.Samsung Galaxy Y S5360 Hard Reset Procedures :

1. Power off phone
2. Press and hold Home Button ( middle ) + Volume Up + power on button
3. Wait for 5 second until Android System Recovery menu appear
4. There are 4 options

reboot system now
apply update from sdcar
wipe data/factory reset
wipe cache partition
 
5. Move the options to " Wipe data / factory reset " using volume down ( - ) button and menu button to confirm, because the touchscreen doesn't work in reovery mode
 
6. After the process done, phone will reboot.


Sunday, June 16, 2013

How To Downgrade The iOS 7 Beta Back To iOS 6 The Easy Way


Upgrading to iOS 7 is a pretty painless process. All that's required is an Apple Developer account and the time it takes to download the install file. Going back, however, isn't quite so easy.
Unlike instances in the past where upgrading to Apple's new beta OS was a one-way road - which will likely be the case again once iOS 7 is released to the world at large - you can in fact still revert back to iOS 6 if you've upgraded to the iOS 7 beta.
(Read more: How To Download And Install Apple's iOS 7 Beta)
If you're like me, you may have thrown caution to the winds by loading iOS 7 on your iPhone without much more than a vague hope that you could restore it to its prior (and fully functioning) glory. Fortunately, it's a lot easier than various online guides are making it out to be.

Step 1: Download The Proper iOS 6 File

In order to install iOS 6, you must pick the proper version or iTunes will spit an error back at you. For the iPhone 5, you must download iOS 6.1.4. For everything else, it is iOS 6.1.3. If you use the wrong file for your device, iTunes will not allow you to restore it.
To review:
  • For iPhone 5, download iOS 6.1.4. Depending on what cellular carrier you use, you will have to download a different version of iOS 6. Make sure you get the proper one for your network: GSM for AT&T and T-Mobile customers and CDMA for Verizon and Sprint. More info and a full list of worldwide carriers here. 
  • For iPhone 4/4S & iPod Touch 5: download iOS 6.1.3. 

Step 2: Plug The Device Into Your Computer, Cancel The iTunes Automatic Sync Process (If It Starts)

When plugging in your smartphone back into your computer, the iPhone may begin syncing its data with iTunes. This could happen even if you had previously had it set to manual sync. This could be problematic if iTunes tries to make a new backup of your device with iOS 7.
You should cancel the sync just to be safe. While I did not let it happen with my device, having an iOS 7 backup could supersede your old backups and keep you from restoring your phone as it was in iOS 6 with all your content - apps, settings, music, photos - intact. Despite that, you should still be able to, at the very least, setup the device as a new iPhone.

Step 3: Do Not Put Your Device Into DFU Mode, Just Hit Restore

The popular notion when downgrading from iOS 7 to iOS 6 is to put you iPhone into DFU (Download Firmware Update) mode, which is Apple's version of recovery mode for iDevices. It turns out that this is completely unnecessary and your iPhone can be downgraded without that extra effort.
To put your iPhone in DFU mode:
  • Hold down the home and power button for 10 seconds.
  • Release the power button while continuing to hold the home button for eight seconds.
(Read more: Apple's New iOS 7: What You Need To Know Now)
This process sets up your phone automatically for a restore. It is not technically required to downgrade to iOS 6. At the same time, using DFU mode will not have any negative effect on restoring to iOS 6. You can use it if it makes you comfortable.
Once your iPhone is recognized by iTunes, simply hold the Alt/Option button on a Mac or the shift key on a Windows machine and click "Restore iPhone..." The option to choose the iOS6 .ipsw file will pop up, the same way it does when upgrading to iOS 7.
Find the proper file, click it and wait. If you don't hit any annoying road blocks, your device should be back on the iOS 6 train. At this point, choose to restore it from a backup and pick your most recent iOS 6 backup. Hopefully, you made that backup the same day you took the iOS 7 plunge.

A Special Case: iTunes Error 3194

If you run into an error immediately following the process of the restore where iTunes says it's verifying your iPhone's eligibility, you might have simply downloaded the wrong iOS 6 file, noted above.
But if you're absolutely sure you have the right file, then you may just be running into a common iTunes error. Cult of Mac detailed how to fix it.
Here's the step-by-step breakdown:
  • Navigate to the Finder, and select Go in the menu bar
  • Click 'Go to Folder...'
  • Type '/etc' and find the 'hosts' file
  • Copy the 'hosts' file and paste it your desktop, then open it in Text Edit
  • At the very bottom of the file, find a line that reads, “74.208.105.171 gs.apple.com” and delete it
  • Drop that file back into the '/etc' folder, choose replace (your Mac may ask you to authenticate the decision). 
  • Go back to iTunes restore using the methods described above
Let us know in the comments if you successfully downgraded from Apple's newest beta. And don't hesitate to let us know if you used a different method from the one described here to downgrade from iOS 7 to iOS 6.


Thursday, June 13, 2013

iOS 7 Download, Install. 3 Methods. Confirmed.


iOS 7 Download, Install. 3 Methods. Confirmed.
The new iOS 7 system promises over 200 new features. You know how to use iPhone, iPad, and iPod touch from the first time you pick them up.


That’s because the revolutionary Multi‑Touch interface in New iOS 7 was designed for your finger. And the simple, beautiful Home screen is the easiest place to start. From built-in apps to over 1 000 000 more apps and games available on the App Store.

Method 1.(Coming soon)

1) Connect your iPhone/iPod Touch/iPad to your computer running iTunes 11 (download now) or later via USB cable
2) New firmware iOS 7 availability message will appear
3) Hit the “Download and Install” button.
4) It’ll download and install iOS 6 on your iDevice.

Method 2. (Recommended)
1) Download iOS 7 firmware for iPhone/iPad/iPod Touch from the this links –> iOS 7 Download.
2) Open iTunes and connect your iDevice via USB cable
3) Select your device from the left navigation panel on iTunes 11
4) Hold down the Shift (Windows) or Alt/Option (Mac) key and hit the restore button on iTunes
5) Browse and select the downloaded iOS 7 IPSW file. Let the restore process complete.

Method 3. (Coming Soon)

1) Select your device and click “Settings”
2) Click “General”
3) Click “Software Update”
4) Download new iOS 7 


HOW TO IOS 7 DOWNLOAD, INSTALL, LINKS,


IOS 7 DOWNLOAD, INSTALL, LINKS,

How to Update to iOS 7 Download. IOS 7 most advanced mobile OS. With its easy-to-use interface, amazing features, and rock-solid stability, iOS 7 is the foundation of iPhone. And even as others try to catch up, the technologies and features built into iOS 7 keep iPhone years ahead.
Updated.

iOS 7 Beta 1 Download Links (Direct links from Mega):
iPad: coming soon.

iPhone 5 (Model A1428) [Mirror]
iPhone 5 (Model A1429) [Mirror]
iPhone 4S [Mirror]
iPhone 4 (GSM Rev A) [Mirror]
iPhone 4 (GSM) [Mirror]
iPhone 4 (CDMA) [Mirror]
iPod touch (5th generation) [Mirror
This is a pre-release version of iOS 7 beta for iPhone and iPod touch. Devices updated to iOS 7 beta can not be restored to earlier versions of iOS.

Evad3rs Jailbreak 6.1.3 iOS 7


EVASI0N JAILBREAK IOS 6 - DOWNLOAD LINKS


EVASI0N DOWNLOAD JAILBREAK IOS 6, 6.0.1, 6.0, 6.1.1, 6.1.2


iOS 6.1.2 / 6.1.1 / 6.1 / 6.0.1 / 6.0 Jailbreak Untethered:

EVASI0N 1.5.3 JAILBREAK DOWNLOAD LINKS

Linux LINK / Mac OS X LINK /Windows LINK


Tuesday, June 11, 2013

How to Delete Apps from iPhone 5


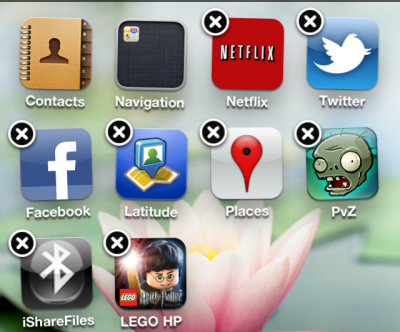
When you download and install various apps in your iPhone 5, you intend to use them, but there are many apps that are not in your use for a long time and you find them quite useless. These apps may include Twitter, Facebook, Latitude, iShareFiles, PvZ, Netflix or LEGO HP, etc. The apps no longer in your use should be deleted from your Smartphone as these can cause filling up the storage space of your iPhone 5.

It is not a complicated task to delete the useless apps from your iPhone 5. First thing is to decide which apps are no longer in your use and should be deleted. Make a list of these apps and then follow the easy and handy method given below.
Steps to Delete Apps from iPhone 5

1. To delete the unnecessary apps from your iPhone 5, you need to go to the “Home Screen” where you can find the icons of these unnecessary apps you do not want to use any more.

2. Now click and hold the icon for a few seconds until a wiggling appears in the icon. You will also see the sign of “X” on some of the next apps, once you hold the icon for a short while. The image given below can show you how the “Home” screen icons will appear in front of you after this operation.


3. Now you just need to click the “X” sign that appears on the upper corner of every app. The sign appears to delete the application and you can delete it by clicking the “X” sign.

4. Now, all of the unnecessary apps have been removed from your iPhone 5 permanently and you do not need to bother about their existence on your Smartphone any more.

5. Click the “Home” key to save these changes you have made to your iPhone.

That’s all! It did not take you more than two minutes to delete the useless apps from your Smartphone. You will see that by deleting the icon from your “Home” screen, you have deleted the complete program and its data from your iPhone 5. Now you have gain more storage space on your iPhone and you can download and install more apps.


Download Android 4.2.2 ROM For Galaxy S3 GT-i9300 with the Specifications of Galaxy S4


Although it has been pointed out by various users that aesthetically the Samsung Galaxy S4 is not that different as compared to Galaxy S3 as the users were expecting regarding its software and hardware. The processors of both of the models are considered the best and the strongest and the camera device in both of them is saliently advanced. The users who are still using Galaxy S3, but they want to enjoy the latest software improvements, Android 4.2.2 ROM would surely fulfill their desire.

Basically it is a trend that whenever a new device is launched, the predecessors of this device are left in the cold. The basic purpose of doing so is to attract the users for grabbing the latest device. Sometimes it is because the older devices are not able to harness the power of managing the advanced features. But this is not the case with the Galaxy S3.

 
Moreover, Samsung has built up a sound track record due to its Galaxy Series. The users of the Galaxy S3, there are a lot of new features of Galaxy S4 that can be enjoyed on Galaxy S3.

As it has been stated earlier that an advanced Android 4.2.2 ROM is available for Galaxy S3 and an OTA is forthcoming. The users, who want to proceed need to get flashing just now. The ROM on Android 4.2.2 for Galaxy GT-i9300 has brought the advanced features of Galaxy S4 for your device.

 
You can not only enjoy using various display modes, but also Driving Mode, the most advanced S Voice feature and the lock screen widgets on your S3. Obviously some prominent features of the S4 like Air View are not added because they are only workable in S4, but it is still amazing to get S4 features to your S3.

You have to use Odin for doing so. The Odin is already added to the package. You just need to put your S3 in download mode and get Odin on it.

Download Android 4.2.2 ROM For Galaxy S3 GT-i9300


Download Android 4.2.2 for your Galaxy S3 from Here.

CyanogenMod 10.1 For Galaxy S4 Download Now Available


CyanogenMod is that most famous aftermarket Android firmware, and although some early tips that the new Galaxy S4 would kick out the Issues when dealing with the CM, and it now looks as those restrictions were a tad overstated. Steve Kondik, the leader Developer behind the whole Cyanogen project, has now moved to G+ will show off the first galaxy S4 builds, which is now available for the T-Mobile and Canadian variants of the flagship handset.

Explained how early the CM team moves on developing the new builds, we are expecting the T-Mobile and Canadian S4 brace to be swiftly followed by the matching with many of the flavors of the Samsung. As a matter of fact, as Kondik notes, the International i9500 is in the next to come, but as the ream has not got the required hold on this specific variant to bring the official support, its development has been rolled back while the time and the resources of the Cm team are now mainly limelight upon these initial two.

 
So, if you are looking to merge yourself completely into the CyangogenMod 10.1 builds for the Galaxy S4 on the T-Mobile SGH-M919 or the Canadian SGH-i337M model, they are now manufacturing and ready to use over the CyangogenMod site.

 
For those Geeks, who is still UN aware of the term “Nightly “might be a little background info. The nightly builds are now launched every 24 hours, and as such can be usually be a very little around the edges. These “Bleeding – edge“ builds are targeted mainly at the developers who want to help the process of bring the CM 10.1 up to scratch, and if you don’t know the Developer side of CM, it’s a good option to leave these nights unless early stability issues have seen looked too.

As best the nighlty is designed, you may also cross “experimental” launch, which are launched in- between nightlies. Again the same pointed rules that can be implemented. So if you are more of a CyanogenMod user than developer, continue with the most precautions.
Download CyanogenMod 10.1 For Galaxy S4

According to the kondik notes, there are “few rough sides” but once these teething problems have been noted, or should be safe for the less qualified among you move in the right. Also, we will perform a fully loaded guideline how to flash it to your Galaxy S4, so stay with us Geeks!

Download CM 10.1 for T-mobile
Download CM 10.1 for Canadian Variants

Download CyanogenMod 10.1 RC1 Android 4.2.2 For Galaxy S3. Nexus 4, And 40 Other Devices


Before some days, we came to know that CyanogenMod 10.1’s nightly build for Galaxy S4 has been launched for the people who are having this great device. It was the great achievement of the CyanogenMod team that now it had released CM10.1 for a selective device. Some long-time users would be well versed that the software released now will be a version dropped rather than to its final release. So, there could not be found any major issues in it and it is pleasing to know that CM10.1’s final release is coming soon.

The team of CyanogenMod took a lot of effort and time in designing every new version of CyanogenMod for all of the general users including a lot of nightly builds and the people who were willing volunteers. Now it seems more enthusiasm and zest in the people with the release of CM10.1. The release candidate of today will surely appease the people who are not able to handle the less stable devices.

 
As compared to the previous versions, it is much smoother and cleaner and you will not see any extra stuff into it. Undoubtedly you will not only find it the aftermarket firmware, but also a lighter and having functional experience.

It could be spanned a lot of Android devices including the Nexus 4 and Nexus 7, popular Smartphone of Google.

Through an announcement, the team explained the term “Release Candidate” in the following words.

“We haven’t used the ‘Release Candidate’ nomenclature since the ICS days, but we feel the 10.1 branch is quickly approaching the point where a ‘final’ build is due. To prepare for that eventuality, RCI builds for CyanogenMod 10.1.0 are now landing on our servers!”.

The team also explains in the releasing note that before the release of CM10.1.0, the RCI release would be sure the final release. So, the users who would like to be involved need to check their device for compatibility and they would get flashed before long. It seems to support most of the general devices and a link of the complete list of supported devices can be found below.
Download CyanogenMod 10.1 RC1 4.2.2

The users can download CyanogenMod 10.1 RC1 Android 4.2.2 for a lot of renowned devices including Galaxy Nexus, HTC One X, Nexus 4, Galaxy S3 and many more.


Download CyanogenMod Here


Friday, May 31, 2013

SP Flash Tools Full Tutorial and Download

What's needed:

USB data cable
MediaTek USB VCOM drivers
SP Flash Tool ( Latest version SP_Flash_Tool_v3.1224.01) 
 
Download: www.mediafire.com/

SP_Flash_Tool_v3.1224.01 Released


First of all, make sure that you have MediaTek DA USB VCOM drivers installed.


Flashing the whole ROM
First of all open SP Flash Tool, then click Scatter-loading button to load the correct scatter file
(MT6575_Android_scatter_emmc.txt or MT6577_Android_scatter_emmc.txt, depending on which phone you have) for your device and ignore any message that may appear.


Turn off your phone, remove the battery and replace it after some seconds (and don't turn on the phone).
Press F9 (or hit Download button) and connect your phone into the computer via USB data cable.
The process will start and a red progress bar will appear.


After the red progress bar is complete, there will appear a purple progress bar.


Right after the purple progress bar is complete, a message will appear underneath it:
“Please insert USB cable in x seconds” and then the download will start right away (you will see the yellow progress bar filling up).


When the yellow bar is complete, you'll get a popup with a green circle and Download OK message,
which means that the process has been successfully terminated.


You can now safely disconnect your phone and turn it on. The process ends here.

Flashing only part of the ROM
In case you want to flash just one part of the ROM, that is also possible. In the shown example, only recovery image will be flashed.
Deselect all parts except the one(s) you want to flash and then press F9 (or hit Download button).


The tool will immediately show a warning because not all parts are selected, but you should continue anyway. Safely press Yes to continue.


The download of the chosen partition image will start and after the yellow bar is complete, the popup with the green circle should appear.


Please note that, even though it isn't mandatory to select it on the list of images to flash,
preloader file must be present in the same folder as the other partition(s) that you want to flash, or else phone will not be able to enter into download mode.

Attention: Please follow the instructions carefully. I will not take any responsibility on whatever may happen with your phone.

Very important warning: Always make sure that you trust the sources of the ROM you download and know that it is meant for your phone.
After flashing a wrong preloader, your phone will be completely dead (can't be powered on, it will not charge and won't be detected anymore by the computer) and there is no way to recover it.


Thursday, May 30, 2013

How to Hard Reset Huawei U8220 [Guide]


Hard Reset Huawei U8220 How to Hard Reset Huawei U8220 [Guide]
Menu+End+Volume Up+Power 2 Seconds For Enter To Recovery Menu
Select Wipe Data/Factory Reset Deleted All User Data
Waiting And Select Reboot


How to root Samsung Galaxy S Korean Version [SHW-M110S] by Any Call


With this guide you will learn how to root Samsung Galaxy S Korean Version [SHW-M110S] by Any Call, After flashing the Gingerbread 2.3.5.

How to root Samsung Galaxy S Korean Version [SHW-M110S] by Any Call

Files Needed :
1- Odin 1.3
2. Kernel File
Lets start :

1- Download files given above.

2- Unplug any USB attached to Computer.

3- Power off the phone.

4- Press and hold Home button with Power button. [Download Mode] then plug USB cable.


6- Run Odin , connect phone in download mode with computer [ Odin will detect]


7- Check the PDA radio button and browse for file. [Tegrak-Kernel-Build-26-for-M110S-VG26.tar]

8- Press start button.

9- Phone will reboot and you got your mission.


Next thing is to install TEGRAK KERNEL

1- Setup wifi and access Android Market.

2- Search and download TEGRAK KERNEL Application, install and run.

3- In TEGRAK KERNEL ” Enable Tegrak Lagfix (all)”.

4- A confirmation message appears , Tap Yes, Phone will reboot after doing some magic it will back by press any key to reboot.

5. Now access TEGRAK KERNEL again and enable rooting.

6- Now your phone is Rooted and have root access.

7- Ready to install SHW-M110S custom rom.

Enjoy

How to Update Samsung Galaxy S Any Call [SHW-M110S] to GingerBread 2.3.5

Files need:
- Odin3 v1.3
-Samsung SHW-M110s Gingerbread v2.3.5
-Kernel File (tegrak kernel)


Lets start flashing :
1- Download files given above.
2- Unplug any USB attached to Computer.
3- Backup all data on the phone if it is necessary to you.
4- Power off the phone.
5- Press and hold Home button with Power button. [Download Mode] then plug USB cable.


6- Run Odin , connect phone in download mode with computer [ Odin will detect]


7- Check the PDA radio button and browse for file. [M110S-Gingerbread-HOME-IMAGE-REV03-VJ04-1944-USER.tar.md5]


8- Press start button.


9- Phone will reboot after flashing , check Firmware Version under [ Setting > About Phone]


Sunday, May 12, 2013

MTK USB flashing tutorial


Here you can find the instructions on how to flash your MT6516 based phone. Although example images shown here refer to HOT HD9, you can flash other phones based on this MediaTek chipset, with the correct ROM files, of course.

Make sure you read everything carefully and know what you are doing. Don't blame me for any damage on your phone.


What's needed:

Flashing cable (USB to UART cable with PL2303 chip)

USB to UART cable Pinout (phone side)

USB data cable
Profilic PL2303 drivers
MediaTek USB VCOM drivers
SP Flash Tool (v1.1110 or higher)
SN Write Tool (alternatively Maui META or WriteCode can be used as well)
And now the tutorial...

Make sure that you have already installed the Profilic PL2303 drivers needed for the USB to 3,5 mm headphone cable.
Open SP Flash Tool for MT6516 and chose which system you want to flash in your HD9. Under project you are able to choose Android or Windows Mobile.
Make sure you have selected the right COM port is selected and that baud rate is set to 921600 bps.
Click on Format to literally format NAND flash of your HD9.

Then turn off your HD9, remove the battery and plug the serial cable to the PC and the jack to the phone.
Click Start, replace the battery and press power button for a few seconds until you see the red progress bar along with the message Format All is Processing.

After the red progress bar is complete, the real format will begin and a green progress bar will appear.

When the process is finished a new window will pop up, just press OK to continue.


Now remove the battery once again, keeping the serial cable connected to the PC and the phone.
Click Download and make sure that every file needed to flash Android / Windows Mobile is selected:
Android
BK Modem DB / RS Modem DB - BPLGUInfoCustomApp_MT6516_S01_MAUI_10A_W10_48
BK AP DB / RS Modem DB - APDB_MT6516_S00_2010_20
PRELOADER - preloader_bird16_a10y.bin
UBOOT - uboot_bird16_a10y.bin
BOOTIMG - boot.img
RECOVERY - recovery.img
SEC_RO - secro.img
ANDROID - system.img
LOGO - logo.bin
USERDATA - userdata.img
Windows Mobile
BK Modem DB / RS Modem DB - BPLGUInfoCustomApp_MT6516_S01_MAUI_09B_W10_16_MP_V5
BK AP DB / RS Modem DB - APDB_MT6516_S00_2010_20
FLASH BIN file - flash.bin
XLDR - MT6516_mldrnandforMTK.nb0
EBOOT - MT6516_EBOOTNAND.nb0


Click Start, replace the battery and press power button for a few seconds until you see the red progress bar along with the message Download is Processing.

After the red progress bar is complete, there will appear a purple progress bar.

Right after the purple progress bar is complete, you’ll have to connect the normal USB data cable. The message will appear under the progress bar: “Please insert USB cable in x seconds”.

After plugging the USB data cable into the phone the download will start. The first time you connect the cable, your computer will detect a new hardware and you’ll have to install MT6516 USB VCOM drivers.

There will be one yellow progress bar for every part of the ROM (preloader to userdata / xldr to eboot).

After all is complete a new window will appear with a report of the download. The following popup should appear:


Now you have completed the process of flashing the ROM into your HD9. Because the NAND flash was formatted in the beginning of the flash progress, you have now to re-write your phone IMEI1 and IMEI2.
Open SN Write Tool and make sure that the correct COM port is selected and baud rate is set to 115200 bps.

While keeping only serial cable connected to the phone, remove the battery and wait 10 seconds with the battery removed.
Click Start and you be asked to enter IMEI1 and IMEI2. Enter the correct number in the correct fields.

After entering the correct IMEI numbers and clicking OK, you have to replace the battery and press power button on the phone. If you have flashed Android, => Meta mode will appear in the bottom left of the screen.


Attention: Please follow the instructions carefully. I will not take any responsibility on whatever may happen with your phone.


Note: All needed tools and drivers can be downloaded from my MT6516 Tools 4shared folder. The password to login is bm-smartphone-reviews.blogspot.com. Have fun.


Update: Here's a trick if you want to flash just one part of the ROM, in this case the recovery. Without formatting flash, deselect all parts except the one you want to flash.


After that, you just have to click start and turn on the phone with USB data cable connected (in this case you don't need the USB serial cable).


PLEASE SHARE MY SITE WITH YOUR FRIENDS.....It will cost you nothing but huge SUPPORT for me

Copyright Text

Copyrights © 2012 Khulna Store, All Right Reserved
Powered by: Khulna Store