Showing posts with label Tips. Show all posts

Sunday, August 18, 2013

Download Windows 8 Lock Screen Customizer to Tweak or Disable Lock Screen

If you are using Windows 8 or if you are following this blog regularly, you might be aware of the new Lock Screen present in Microsoft's latest OS Windows 8. This new Lock Screen is quite similar to the screen present in smartphones. Windows 8 Lock Screen basically shows current date and time along with a nice background image which can be changed using PC Settings aka Metro Control Panel.
Windows_8_Lock_Screen.png
We have posted a few tutorials in past to customize Lock Screen in Windows 8 such as customizing date and time format, customizing day name appearance, changing background image and disabling Lock Screen. You can find them at following links:
Today in this article, we are going to share a new freeware which allows you to tweak and customize Windows 8 Lock Screen. This free tool has been developed by our friend hb860.
"Lock Screen Customizer" is a free and portable software for Windows 8 which allows you to:
  • Change Lock Screen background image
  • Change date language
  • Change date and time format (12 or 24 hours format)
  • Change color set of Login or Sign in Screen
  • Set Slide Show of background images which change at every startup
  • Enable verbose status messages at login screen as described here
  • Disable or turn off Lock Screen
Windows_8_Lock_Screen_Customizer.png
You can see this small utility comes with many useful features. You just need to download the utility and run the appropriate version and you are ready to tweak Lock Screen.
It supports both 32-bit and 64-bit editions of Windows 8. Interested people can download it using following link:


Microsoft.NET Framework 3.5 Offline Installer for Windows 8


Microsoft.NET Framework 3.5 Installer for Windows 8

The new Microsoft Operating system Windows 8, comes and is installed with Microsoft.NET Framework 4.5 and 4.0 by default. This is great when we want to run Apps which have been built with the recent versions of .NET Framework. But what if we want to use Applications which we have been previously used with earlier versions of Microsoft Windows? As many of them are built using the .NET Framework 3.5, 3.0 and 2.0 versions we won’t be able to run them on Windows 8 since it is not installed by default though the Windows 8 installation media contains the installation source of the latter Framework versions.
Consequently, Microsoft.NET Framework 3.5 can be downloaded and installed through the internet but it would be rather a hassle if we don’t have an Internet connection. Hence, Today I’m going to introduce a software that aims to install Microsoft.NET Framework 3.5, 3.0 and 2.0 from the Windows 8 installation media itself and does not requires an Internet connection.

Read full article at AskVG.com: Microsoft.NET Framework 3.5 Offline installer for Windows 8.

Thanks to AskVG.com for publishing this Application


How to use:
1) Insert your Windows 8 installation disk.
2) Select your drive letter from the software.
3) Click on “Install” to start Installation
Or if you don’t have the installation disk but you have the installation media stored on a storage device, alternately you can browse for the “sxs” folder then click “Install”.


Thursday, August 8, 2013

Download CyanogenMod 10.2 ROM for Galaxy S4 GT-I9500

Finally, here is CyanogenMod 10.2 ROM for Samsung Galaxy S4 GT-I9500. It is not the official ROM from CM Team. But good for those who can’t wait and want to have a taste of latest Android 4.3 Jelly Bean on Galaxy S4 I9500. Most of the stuffs are working fine. Example, you can make / receive call and SMS. Wi-Fi, GPS, Bluetooth and Google applications are working. No luck on camera and sound quality for the moment. But rest assures that all these bugs will be fixed in later release. Don’t expect much from alpha build, right?


CyanogenMod ROM for Galaxy S4 I9500

CyanogenMod-ROM-Galaxy-S4-GT-I9500_02
Android 4.3

Download CyanogenMod 10.2 ROM for Galaxy S4 GT-I9500 here.


Wednesday, August 7, 2013

How To Root Samsung Galaxy Grand Duos GT-i9082


 Samsung Galaxy Grand Duos GT-i9082
Samsung Galaxy Grand has been voted as the best selling smartphone of year. It has 1.2 GHz dual-core processor, 5” screen and it runs on android jellybean. It has features of S3 as well as Note. It has dual-sim functionality along with an 8 MP camera and 2100 mAh li-ion battery. I am going to provide you the steps you require to root your Grand Duos. Once rooted; you will find that your phone is completely changed into something incredible. Before that you must know that rooting will void you manufacturer’s warranty and you solely will be responsible for whatever happens to your device.  In rare cases, your phone might be soft- brick, which could be repaired but for that you need to put some extra effort from your side. For the 1st time user, please read all the details about rooting before jumping to any conclusion.
Prerequisites before rooting Galaxy Grand Duos:
  1. USB Debugging is needed to be enabled on your phone. For this go to settings> application>  and finally click the box next to USB debugging
  2. Make sure your battery is more than 80%.
  3. You must have Samsung USB drivers in your PC.
  4. Rooting is done through ODIN. So Download ODIN and extract it to your computer.
  5. The root guide is done through CWM recovery and for that you need to download CWM_gt_i9082_droidviews.tar.md5 CWM recovery image to your computer.
  6. Download the UPDATE –SuperSU-v1.00.zip root package and place it on the root of your phone’s sd card.
Steps For Rooting Samsung Galaxy Grand Duos GT-i9082:
  1. First power down your phone and put it in download mode by pressing volume up+ home+ power button and wait till screen wakes up.
  2. Connect your phone with pc by using USB cable and open ODIN on your PC.
  3. If ID: COM section of the ODIN is yellow that means it has recognized your Grand and is ready for the work.
  4. Now click on PDA button in ODIN and choose CWM_gt_i9082_droidviews.tar.md5 you downloaded earlier in previous step.
  5. Make sure you ticked the box of “Auto Reboot” and “F.reset time”. Everything else should be unchecked.
  6. When you press the start button the flashing process will start .wait until the process is complete. Do not disconnect the phone in between.
  7. When the process is over you will get a PASS message from the ODIN and now your phone will reboot.
  8. After reboot, turn your Grand off and then press the volume up, home and power buttons simultaneously. The phone will be turned ON and the Samsung logo will blink twice after which you can let go power button but you should still keep your on volume and home buttons until a list of options come onto the screen. You will see something as ClockWorkMod recovery.
  9. Touch will be ineffective for now, press volume up to scroll up and volume down to scroll down, Home button for selection and power button to take you back to the previous settings.
  10.  Now select install zip from the SD card and find UPDATE-Super SU-v 1.00.zip on your micro SD card or internal memory.  When you are prompted to confirm, select yes.
  11. Now the rooting will start and after some time when it’s completed select the option go back and  then select reboot the system now .after rebooting,  your Grand Duos is completely rooted and you can use it now.
Now you will be able to enjoy a rooted Galaxy Grand Duos along with ClockWorkMod recovery.

Make Your Android Device Look Like iOS 7


 jbOS7 - iOS 7 like theme for Android
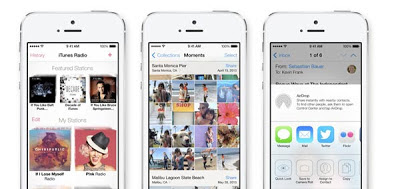
Apple iOS 7 is here with lots of clamor and bang. The new update has not created the stir as it was expected from the US giant; however it still managed to draw the eyeballs of tech geeks all over the world. While apple fans hailed this complete overhauling of the OS, the Android supporters claimed iOS 7 to be the copy of Android itself. Whatever it is, if you are an Android user and has always itched for having the feel of the Apple, you can always do that because the versatility of Android OS provides you with an opportunity to change the feel of your device without tinkering with its core functioning and lets you enjoy whatever you wished for. If you are considering changing the look of your device to iOS 7, then I assume that you must have heard about this iOS update and have gone through all its details. And for those who do not divulge much into the details, they must have been smitten by the design of the iOS 7 interface. There were lots of comparisons made between Windows and iOS phone on the OS, leaving android feel like a bit of an outcast. The developers at CNET have come up with a new theme dubbed appropriately enough, Jelly Bean OS 7. The theme comes with a slew of customizable icons that completely mimics the latest offering of the iOS that is iOS 7.This new theme gives you 3D feel but you should be holding a premium Android device as much of it depends on the hardware of your device. It works with Nova Launcher, which allows user to replace their home screens, provided their phones are using Android 4.0 or above. Although the theme cannot guarantee you a 100 % iOS 7 experience, also because even though there has been the official announcement of this update but the final version has not been unveiled and is still to come, but it does do more than just skin the home screen. As said by the developer, the theme also has a lock screen as well as well as two additional screens that acts as an app. For example, you press the weather icon and it takes you to the weather screen rather than open the weather app.
This all development and significant minute changes results in a really slick looking interface that looks a whole lot like iOS 7, while retaining the personality of the Android. And for those die- hard fans, who think that giving it a try might take them into iOS boundary completely, you need not to worry as you are just utilizing the best of your OS, its Versatility.

How To Root Samsung Galaxy S Duos S7562 & Install CWM Recovery

Samsung Galaxy S Duos S7562

Samsung Galaxy S Duos is the upgraded version of the original Galaxy S series. It has 1 GHz single core processor, 4” screen, and it runs quite smoothly on Android 4.0. It features Samsung TouchWiz UI. I am going to help you in rooting your device but before that you must know that rooting will void you of manufacturers guarantee and you solely will be responsible for whatever happens to your device.  In rare cases, your phone might be soft- brick, which could be repaired but for that you need to put some extra effort from your side. For the 1st time user, please read all the details about rooting before jumping to any conclusion. Now I am going to list down the steps for rooting:
Prerequisites before rooting Galaxy S Duos:
  • USB Debugging is needed to be enabled on your phone. For this go to settings> application>  and finally click the box next to USB debugging
  • Make sure your battery is more than 80%.
Steps For Rooting Galaxy S Duos S7562:
  • Download the Samsung Galaxy S Duos rooting kit.zip from http://d-h.st/BtL. The file contains everything you need for rooting in 12 MB package.
  • Install the driver for your Galaxy S Duos using Kies.
  • Power off your device.
  • Boot into downloading mode by pressing Volume Down + Home + Power button simultaneously until the Samsung logo appears on your device.
  • Read the Warning, press volume up to continue to downloading mode. You will have a screen written “DOWNLOADING” along with other usual stuff.
  • Connect your phone to PC.
  • Extract the rooting kit and extract and open Odin from there.
  • Odin will detect your device on the port.
  • Now on the screen appearing right in front of you tick “F. Reset Time” & “Auto reboot” option.
  • Click on PDA under the file section in Odin and browse to recovery.tar file.
  • Remove the back panel as you will be needed to remove the battery with great timing.
  • Click on start. a green bar will show you the progress made by Odin in flashing. When the bar says pass, your phone will start a reboot.
  • A while rebooting, the phone will shut down and the device will vibrate once before shutting down, you have to remove the battery and disconnect your phone from the pc.
  • Copy a file named CWM -3.1.3. zip from your rooting kit into your external or internal SD card.
  • Power off the device and boot into clockwork recovery mode by pressing volume up+ volume down + power +home button simultaneously till the Samsung logo appears followed by a CWM screen.
  • Touch will be ineffective for now, press volume up to scroll up and volume down to scroll down, Home button for selection and power button to take you back to the previous settings.
  • Select backup by scrolling down to backup and restore, make sure you have 2 GB of free space in your memory.
  • Go to install zip from the SD card option and select “choose zip from external/ internal memory card”. Select the CWM-3.1.3. zip and browse it until you get “yes” in a long list of No. select yes.
  • Now enjoy SuperUser power on your device once you reboot it.
  •  

Monday, July 15, 2013

Install Official Android 4.0.3 Update Huawei Ideos X5 U8800 Pro


The time has arrived for Huawei Ideos X5 U8800 Pro users to install Official Android 4.0.3 ICS firmware update on their devices. I know most of the users are you thinking how to install it right? Then we have prepared a detailed tutorial procedure on below. Huawei Ideos X5 U8800 Pro was upgraded version of his older brother Ideos X5 U8800 and it was launched in April, 2011. It was shipped with Android 2.3.5 Gingerbread OS. Recently Huawei Company has released Official Android 4.0.3 Ice Cream Sandwich ICS update for Ideos X5 U8800 Pro in June month with many bug fixes and also added new features. Sad news is they didn’t release the update via OTA (over the air); users must download the ICS rom file from the official website and install it manually. The phone has 800 MHz processor and Adreno 200 GPU that is supporting ICS well. Check out the detailed list of new features below added on this Android ICS firmware for Huawei Ideos X5 Pro:


Huawei UI Smart dialing feature
Huawei UI Smart search for contacts
Added Microsoft Exchange synchronization
Optimize the boot speed
Optimize the GPS speed
Support the WPS feature (Wi-Fi)
Enhanced WI-FI wireless performance
DLNA Support
File manager Support for file browse, more convenient for find files
Improved Huawei User Interface UI, which improves the charge design when phone has power off.
Now Camera Supports ‘Camera UI Style’, Autofocus and Touch Focus
Camera also supports HDR Feature, Panorama mode Feature
Optimize Power-Off Alarm


Warning: This article is only meant for educational purpose. Therefore, neither we nor the developer should be held liable for any damages caused to your phone while following the methods and procedures. This procedure will not void your warranty, so you can claim your warranty back when going to huewai service center.

Pre-Requisites:

1. The methods and procedures in this article should only be tried only on Huawei Ideos X5 U8800 Pro.
2. Ensure that there is at least 70% or more charge with your device, so that there is no Power interruption during the process.
3. Please backup all essential data’s on your phone, to assure that there will be no data loss during the process.
4. Disable all Security programs like Firewall and Antivirus from your computer and uninstall the same from your phone, as these security programs generally tend to interrupt the process.
5. Enable USB Debugging in your Huawei Ideos X5 U8800 Pro from the path “Settings > Applications > Development > USB debugging”. The option of USB Debugging should be ticked.
6. There is no need of rooting the device for installing this rom.

Steps and Procedure to Install Official Android 4.0.3 Ice Cream Sandwich firmware on Huawei Ideos X5 U8800 Pro:

1. Download the Official Ice Cream Sandwich firmware package for your Ideos X5 U8800 Pro device from here to your computer. The file name was HUAWEI Ideos X5 firmware( U8800pro_Android 4.0_V100R001C00B926_Normal).zip and size will be 356MB.


2. Now, connect your device to the PC via original USB cable. Make sure you have all necessary drivers installed in your PC for your device.


3. Extract the downloaded zip file then you will get dload folder and copy that ‘dload’ folder into the root directory of your phone micro SD card.

4. Now, turn off your device and then turn it on again and there would be Android Robot on the screen which indicates that the installation process of the ROM has been started successfully. On successful completion of the installation you will get “OK” on the screen.

5. Remove the SD card of the phone after verifying the installation was successful and then press Power button to reboot the device and land onto the latest Android 4.0.3 Ice Cream Sandwich firmware.

Note: If you get a “FAIL” message during the process of installation. Kindly follow the steps again to install the firmware on your device.

That’s all; you’ve successfully installed latest firmware Android 4.0.3 V100R001C00B926 on your Huawei Ideos X5 U8800 Pro. Share your experience with us and let us know your issues, we are here to help you always.


How to Root & Unroot Samsung Galaxy Y Duos GT-S6102


I have seen most of the users looking for tutorial How to Root & Unroot Samsung Galaxy Y Duos GT-S6102. Galaxy Y Duos was first Dual Sim Android Smartphone from Samsung it has done pretty well in Indian as well as Asian market. There is a huge customer base. Until recently there were no updates and Rooting mechanism for Galaxy Y duos GT-S6102. But XDA dev forum member millan.SIS has introduced a very simple way to root the device. So that users can enjoy and install custom firmware roms like Cyanogenmod 9, MIUI and many more. If you are on Android 2.3.5 gingerbread OS, the rooting process will be easier for you. Take a look at below we have created a detailed Guide to help you with flashing root package and superuser app to Galaxy Y using base recovery.


Disclaimer: The rooting and unrooting process for your Samsung Galaxy Y Duos GT-S6102 would void the warranty for it. That means you won’t get free services for your Samsung device. Do this action only if it is quite urgent. If you are going to follow this process then it’s your own risk. Apart from this, neither we nor the developer should hold responsible for this. If you are looking for its warranty then unroot it before going to nearby service center.

Pre-Requisite:
1. You are recommended to disable the Antivirus and firewall in your Computer as well as in your Samsung galaxy Y Duos just to insure that it won’t conflict with the running process.
2. Minimum charge required to complete this process is 70%. Below this would cause interruption in the rooting process. Your device may face power issue during the process.
3. You must take the backup of the following items before starting the rooting process. This is the list – SMS, Call logs, Contacts, Images, Audios, Videos, Bookmarks, APN (Access Point Names) settings, MMS settings and more. If you have something important other than this then you must include it in this backup process.
4. Download and Install the latest Samsung Galaxy Y Duos device driver from its Official Site. For this you need to have a Windows based Computer and USB data cable.
5. You must also create NANDRID backup of your current ROM.
6. Enable the USB Debugging Mode on your Galaxy Y Duos. Follow the path to enable it - ‘Settings>Applications>Development>USB Debugging’. Now, check the USB Debugging option.

Steps and Procedure How to Root your Samsung Galaxy Y Duos GT-S6102

1. First of all you need to download the rooting package update.zip file from here. After that connect your Samsung Galaxy Y Duos to your PC and copy the update.zip file to the SD card.

2. Switch off your Galaxy Y Duos and reboot it into the stock recovery mode. You can enter into recovery mode by pressing and holding the Power button and Volume button together till the SGY Duos Logo displays on the screen. When logo appears release the buttons then you automatically enter into the recovery mode. below you can see image how it will look.

 
3. Use the Volume button to navigate in the recovery mode and use the Power button to select ‘install zip from SD card’ and once again select ‘choose zip from sd card’. After that, you need to select ‘update.zip’ file to flash rooting package.

Note: If you don't see above steps, then you can directly select the option called "apply sdcard:update.zip". which you can see in the above image.

4. Confirm you selection by saying ‘Yes’ to the process. This may take few minutes to finish the process.

5. Now, you have successfully rooted your Samsung Galaxy Y Duos.

If your device has got problems like sound not coming from speakers, sd card unable to detect and etc. 5. Before going to the Samsung service centre, you need to unroot your device in order to get back the warranty and fix all those issues.

How to Unroot your Samsung Galaxy Y Duos GT-S6102

If you are going to unroot your Galaxy Y Duos to revert your warranty back then you should follow me in here.

1. Download unrooting package from here.

2. Turn off your Galaxy Y Duos and reboot your device to enter into recovery mode.

3. Then, you need to choose ‘unroot.zip’. After that you will see Busybox remover has been added in there.

4. Remember that, your CWM Recovery method can be used for both – rooting and unrooting. In CWM, don’t forget to use ‘Backup & Restore’ option and also create ‘Nandroid’ backup.


How to Root Samsung Galaxy S Advance I9070 Gingerbread 2.3.6 All Firmwares


Today our tutorial How to Root Samsung Galaxy S Advance I9070 on all Android Gingerbread 2.3.6 firmware versions. Check the latest baseband firmwares ZSDL1, DXLD1, DDLI1, DXLD2, PXXLD2, DDLD4, JPLD3, ZSLE4, XXLD1, XXLD2 and XXLE2. If your device is running with anyone of above firmwares then you can root the device easily by following my guide. Samsung Galaxy SII is successor of Galaxy S but Samsung launched a modified form and named it as Galaxy S Advance I9070. This is a mid range Android Gingerbread phone with some added features like Dual core 1 GHz processor with Mali 400MP GPU. With that features Samsung wants make Galaxy S Advance device better than Galaxy S and comparable to Galaxy SII. We are here with a detailed guide to help your with rooting your Galaxy S Advance I9070. Samsung has not released any firmware updates yet to update to ICS. But if you root your phone and install clockworkmod CWM recovery then you can install Custom Android 4.0.4 ICS ROM.


Warning: Rooting will voids the warranty of the device. If anything happens to your device we won’t responsible for that damage. Do it as your own risk by following below steps carefully.

Requirements

1. This root tutorial will only works on Samsung Galaxy S Advance I9070.

2. Make sure that you have backup the data, apps and settings from your Samsung device such as SMS, MMS, Call Logs, Contacts, Images, Audios, Videos, Bookmarks, Wi-Fi, APN settings and MMS settings etc as this process is going to wipe every data from your device.

3. Check of security suites such as antivirus and firewall whether they are disabled on your Computer.

4. You need to turn on the Enable USB Debugging on your Samsung Galaxy S i9070. This can be done simply by following the path ‘Settings > Applications > Development > USB debugging’ and ticking the USB Debugging option box.

5. Please put your battery in charge and make sure that it was charged to at least 80%.

Advice: Before going to start the root process you must go to phone settings->click about phone and look for basedband version number. Note down that number in notepad and save it on the desktop.

Steps and Procedure for Rooting Samsung Galaxy S Advance I9070:

1. Download working root package zip file from here to PC.

2. Once you have downloaded the file, then you need to extract the zip file in the PC.

3. After extraction is done. Open the folder there you can see a file name Odin3 v1.83.exe.

4. Launch the Odin3 v1.83 application in the computer.

5. Turn off the device in order to enter into download mode. For that do like this press and hold the Volume Down + Home buttons together and Power On the device simultaneously. After 1 min you will get a download mode with green android robot image.

6. Connect your device to the Computer via USB data cable while Odin is open. Once your device get connected, ID:COM section turns yellow in colour. If it doesn’t than you need to reconnect your device.

7. In Odin tool you need to two select two files into their respective fields.

a) Click PIT tab and then select the GT-I9070_EUR_XX_8G_20111220_KL6.pit file from the extracted folder which we done in step 2. Once you selected the file left side Re-partition filed will be tick marked automatically. So you need to uncheck it manually. For more idea see the below picture.

b) Click PDA section and then select the rootkernel.tar.md5.

c) You need to uncheck all other option except ‘Auto Reboot’ and ‘F Reset Time’.

 
 8. Click on ‘Start’ button and wait for the process to get completed. The Samsung Galaxy S device will reboot automatically.

9. Now you must try to install Superuser and Busybox from Google Play Store which is the easiest way to do it. Once you installed both apps then your device will be rooted successfully.

Well it’s time to switch back to stock original kernel basedband firmware version number. Because above we used kernel for rooting the device have some problems like sudden reboots and lags. So that you need to install exact kernel to the device again. I already told you above advice note down the number and save it on the PC.

Download anyone of the them based on current firmware DDLD4, JPLD3, ZSLE4, XXLD2, XXLE2, BULE2, DDLI1, DXLD2 andr PXXLD2.


Right now my baseband version is XXLE2. So I’m going to download xxle2 file to go back to stock version. Choose the file according to your device baseband version.

1. Run the Odin application again in the PC.

2.Turn off the device and Boot into Download mode. For that press and hold the Volume Down + Home buttons together and Power On the device.

3. Connect the device to PC via USB cable.

4. Click on PDA tab and select the file which you downloaded recently. I selected xxle2.tar.md5 because before I was running on this firmware.

 
5. Click on Start and the process will be completed. The device will be reboot automatically.

That’s it your device is rooted perfectly without any problems. In case if you find any issues with above procedure comment here. We will try to solve your problem


Install Android 4.0.4 ICS Update on Samsung Galaxy ACE S5830 CyanogenMod 9 Firmware


Today i will guide you how to Install Android 4.0.4 ICS Update on Samsung Galaxy ACE S5830 with CyanogenMod 9 Firmware Rom. We have good news for Samsung Galaxy Ace S5830 users, now you can install Android 4.0 Ice Scream Sandwich ICS OS on Galaxy Ace with the help of flashing the software. Already Samsung stated that there is no ICS update for Galaxy Ace due to low hardware specifications. So Its very excitement that Cyanogen Mod 9 will give you maximum potential that you can enjoy a lot and able to see hidden settings in your phone. You can do that all steps with given steps, its so easy. if you have any error or confuses then you comment below and we will solve your problems. Below you can see the phone status from which firmware and kernel it was running and how much ram will be going to be use in this ROM.


Its previews version have some bugs and errors so that all bugs and errors are solved in this version. (i.e Camera was not working in old ROM) and one more think is important that is this ROM can be installed only on rooted devices.


Before the Update your Device, first note that your device your device should be already rooted. then you will also need to wipe data so that your new unofficial CyanogenMod Mode 9 based ICS Beta 8 firmware install easily. Now you can upgrade your device to ICS if you need any help then just use our comments area. we will always help you.


Features of CyanogenMod 9 ROM


With this ROM you can enjoy new futures like boot, GSM (phone/messages/GPRS/EDGE/3G), Wi-Fi, Bluetooth, HW Acceleration (full), Sound, Headphones, GPS. All sensors like (proximity, rotation etc), Cyanogen Mod settings (not all, it’s not fully merged by CyanogenMod team, not my fault), Market (now you can download all apps available for Gio with GB), Fixed animations (now it looks so good), Facebook sync, Buttons backlight, GMail fully works, Browser fully works, ICS keyboard Games.


Serious Warning: Before starting below procedure you must have rooted the device and install clockworkmod cwm recovery manager on it. If you don't done above above two things then looking on other blogs. It's your wish still want to install the android ics update on your device then your device will be bricked and stuck at Samsung logo screen.
Update Galaxy ACE S5830 to CyanogenMod 9

Step 1. Download the zip file for the ICS CM9 from here. Click Download. The file name should be the Samsung-Galaxy-Ace-ICS-CM9-Beta-8.zip file which was 125mb file size. Click Download and save it on your PC.

Step 2. Now connect the smartphone to your computer and then move the above firmware zip on the phone’s SDcard. Now disconnect the device from the PC and then proceed and power off the phone.

Step 3 Enter into recovery mode by pressing and holding the menu center button and power button together. In case it boots into normal mode, then you should repeat the action. Remember that this should be done when the phone is OFF.


Note please follow this. Once you entered into Clockworkmod recovery you must do both wipe data/factory reset and wipe cache partition before installing the firmware zip file from the SD card.

Step 4 When Clockmod Recovery shows it main screen you need to select the option that says ‘install zip from sdcard’ and then ‘choose zip from sdcard’. Select the zip file you’ve moved at step 2 and then confirm the installation of the new firmware files.

Step 5 When the update is complete you need to get back to the main recovery menu and select ‘reboot system now’. Please note that your phone will perform its first boot with the new custom ROM. Also, this might take a while before loading all the apps and the Android ICS home screen.

However, in case the first boot take too long to load it means that something went wrong and you will need to repeat all the above steps.

That’s it, you have installed CyanogenMod 9 with Android 4.0.3 ICS on your Samsung Galaxy Ace S5830. If you have any problems on this rom comment here we will find solution for your problem.


Root Verizon Samsung Galaxy S3 I535 Install Clockworkmod Recovery

Today our tutorial How to Root Verizon Samsung Galaxy S3 SCH-I535 and install clockworkmod recovery on latest Android 4.0.4 ICS. Verizon launched Samsung Galaxy S3 lately but seems like this phone has attached too much customers due to Verizon high speed LTE 4G data network in USA. XDA developer forum member eMpTy43 has released the GS3DebugFSRoot tool to root Verizon SGS3 easily by following on screen instructions. With that simple tool you can gain root access on your device and then install the clockworkmod CWM recovery. On clockworkmod manager you can flash different custom roms like Android 4.0 ICS and Jelly Beam 4. 1Cyanogenmod, MIUI and many more. Tweaking the kernel will get more performance to the device by running multiple number of apps without any lag. This is a complex procedure but we have tried our best to simplify it.
Warning: Rooting will voids the warranty and also there is chances of damaging the device. Do it as your own risk no one will responsible if anything happens to your phone and follow my guide carefully.

Requirements

1. The above rooting procedure only works on Verizon Samsung Galaxy S3 SCH-I535 model. Applying this instructions on other Verizon galaxy variants will leads to damage.

2.Charge your device battery to minimum 70% before you could start the process.

3. Recommended to disable security suites such as antivirus and Firewall from your Computer to avoid conflict.

4. All the data that your Samsung Galaxy S3 has must be backup. We suggest for manual backup of SMS, MMS, Contacts, Call Logs, Bookmarks, Videos, Images, Music, and Settings (of APN and MMS).

5. Turn on to Enable USB Debugging option on your Samsung Galaxy S3 device by navigating yourself to the path ‘Settings > Applications > Development > USB debugging’.

6. Go to Settings -> Security -> Tick mark the Unknown source option.

7. Download and Install compatible USB device drivers for Verizon Samsung Galaxy S3 SCH-I535 from here.

Steps and Procedure for Rooting Samsung Galaxy S3 SCH-i535 on official Android 4.0.4 ICS baseband firmware version I535VRLG1, I535VRLG7 and I535VRLF2.

1. Download working GS3DebugFSRoot tool zip file package from here to your PC.

2. After download is completed. Extract the package in the PC.

3. Open the extracted folder and Run the RootDebugfs.bat file by double clicking it.

4. A command prompt console window will be opened in the screen. Press 1 to select and start the rooting process.

5. In this step press y for confirmation.

6. After confirmation is done. In the next three windows you need press any key to continue.

7. At last window it shows message like “waiting for device to be detected”. Now you need to connect the device to PC via USB data cable.
8. Your device will be reboot 3 or 4 times during the process. So be patient and don’t do anything until the process is finished.

9. Once device is loaded to android OS you can see superuserSU in the apps list. That’s it your device is successfully rooted without any problems. If u want to check whether device is your rooted or not. Go to Google play store and download app called root checker. Install the app and check the root verification access.

Flash and Install Clockworkmod recovery on Verizon Samsung Galaxy S3 i535

1. Download anyone of the zip file based on your choice.

  • ClockworkMod Recovery 6.0.1.2 here to PC. File name CWM_6_Non-Touch.zip and size of 5.41 MB.
  • ClockworkMod Touch Recovery 6.0.1.2 here to PC. File name CWM_6_Touch.zip and size of 5.41 MB.


2. Well I prefer normal recovery version because it works perfect. Extract the zip package in the PC.

3. Download Odin3 v3.07 zip file from here to PC. Extract the Odin zip file then open the folder you get an Odin3 v3.07.exe.

4. Launch the Odin3 v3.07.exe application in PC.

5. Turn off the mobile. Now press and hold volume down and Home buttons and power buttons together until you will see a warning message appears on the screen. Press Volume Up button to get into Download Mode.

6. Connect the device to PC via USB Cable while Odin is open in the PC. Once odin is recognized the device you can see a sky blue color in the ID:COM section and also added message will appear in below message box.

7. Now click on PDA tab and select ODINRecovery.tar.md5 which you got extracted in step 2.

8. Click on Start button to flash recovery. Once process is completed the device will be reboot automatically and you will get green color Pass message in Odin.

9. If you want to test whether clockworkmod recovery is installed perfectly or not. Then power off the device. Press and hold Volume up and Home button and Power Buttons.
10. Once you see above screen in the device then you can enjoy by flashing zip files directly from the phone itself.


Sunday, July 7, 2013

Install Android x86 4.2 Jelly Bean on USB flash drive


The Android-x86 project is a project that aims to deliver the Android supports to various X86 platforms.

The features of Android-x86 Jelly Bean 4.2 test build 20130228 includes:

Linux kernel 3.8.0 to support more drivers.
OpenGL ES hardware acceleration for AMD Radeon and Intel chipsets.
Multi-touch, Wifi, Audio, G-sensor, Camera and Backlight control supports.
Simulate SDCard by internal storage.
Auto mount USB drivers and SDcards.
Multi-user support (Max 8 users).
Support Ethernet (DHCP only).
Support VM like Virtual Box.

However, the test build 20130228 does not support ARM translator which means you cannot use many Android applications and games in Google Play. To have ARM app compatibility and much stable Android-x86, you have to go with the older version Ice Cream Sandwich RC2.

Things you need are 2 units of USB Flash Drives - at least 256MB flash drive as Android USB installer, and preferably 1GB or more flash drive storing Android OS will do.


Steps:
Download Android-x86 image file.
Create Android's USB installer stick with UNetbootin.
Plug in the second USB Flash Drive.
Restart computer and boot the Android USB installer stick.
Choose Install Android-x86 to harddisk.
Choose the USB flash drive you want to install Android-x86. Usually either sdb1 or sdc1, make sure you know the correct one. It's different in different computer.
Choose Yes to format the partition.
Choose Yes to install boot loader GRUB.
Choose Yes to create a disk image to save the user data.
Input minimum 512MB, or can be max up to 2047MB to define the storage size of disk image to save user data.
Choose Run Android-x86 or Reboot.
Voila, everything is all set.
Please note that running on USB flash drive is a few times slower than the same operation on traditional hard drive, especially the first loading. After hours of playing the 'Android Jelly Bean mini PC', the main issue is many drivers are still unsupported yet. Other known issues are:

Suspend and resume (lock screen) doesn't work.
Some apps stuck on i915/i965 devices.
Bluetooth not work.
Not support Arm translator.


How to run Android-x86 4.2.1 Jelly Bean iso


Android-x86 has released the first iso image file of Android Jelly Bean on Christmas Eve available for download. The jb-x86 is based on Android 4.2.1 and this is the first Jelly Bean test release version, so it is possible to see a few bugs here and there. I have tested it on Asus laptop and so far everything seems to work reasonably well, including the WIFI connection. As we expected, Android jb-x86 runs smoother and responsive compared to the AndroVM Jelly Bean.

But bear in mind again, jb-x86 is still under test release stage at the moment. One I problem I had was jb-x86 went unstable and whole system blackout while I was connecting my WIFI access point in the one time Android setup wizard welcome screen. How I bypass it is by skipping it not to connect the WIFI first. Connect the WIFI later manually after I finished the setup wizard.


Here are the steps how to run/install Android Jelly Bean iso:
Download android-x86-4.2-20121225.iso
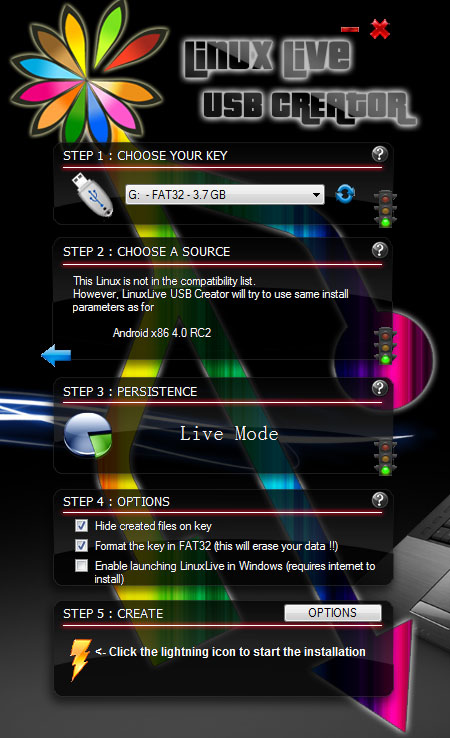
Download LinuxLive USB Creator (LiLi) and install.
Open LiLi USB Creator and follow the steps below:STEP 1 : CHOOSE YOUR KEY - Select your flash drive.
STEP 2 : CHOOSE A SOURCE - Click on ISO / IMG / ZIP and pick android-x86-4.2-20121225 iso. LiLi will use Android x86 4.0 RC2 install parameters to create.
STEP 3 : PERSISTENCE - Just leave it default.
STEP 4 : OPTIONS - You may check or uncheck the boxes according to your preferences. These will not affect jb-x86 installation.
STEP 5 : CREATE - Click on the lightning icon to start the installation.

Once the installation is done, restart your computer.
Before loading BIOS, choose your flash drive to boot first. Usually by pressing ESC or F10 key, you may have to refer your computer's manual guide.
Try/Install Android Jelly Bean:
Select Live CD - Run Android-x86 without installation to try jb-x86 before your install it. (Strongly recommend you to try the OS first)
Select Installation - Install Android-x86 to harddisk if you wish to install.

For those who choose to install jb-x86 iso:
Partitioning page appears, you may choose an existing partition or create a partition to install jb-x86. You can also install jb-x86 on USB flash drive.
On filesystem page, choose Do not format to avoid the partition from formatting. Otherwise, choose a filesystem type to format.
Select Yes to install boot loader GRUB in order to be able to boot jb-x86.
After installation is completed, Hit Reboot.
Done. Android-x86 4.2.1 Jelly Bean is up and running.
Please read here if you wish to uninstall Android-x86 and GRUB Loader. 


How To Downgrade iPhone 4S and iPad 2 With Redsn0w [From iOS 5.1.1 To 5.0.1]


Accidentally upgraded iPhone 4S or iPad 2 and "stuck with" the latest firmware which no jailbreak yet? The iPhone Dev Team has released the updated version of Redsn0w tool which allows you to downgrade iPhone 4S and iPad 2's iOS version so that you can jailbreak them again.

Note:

You need your SHSH blobs saved in order to downgrade. If your iPhone 4S or iPad 2 have launched Cydia before, Cydia server should have saved the SHSH blobs for you automatically.
This guide works for A5 devices only.
If you are a iPhone unlocker, do not downgrade iOS with this guide because it will update your baseband.
Tools you need:

SHSH blobs, either saved on Cydia or computer locally
iOS 5.0.1 and iOS 5.1.1 firmwares
Redsn0w ( Mac / Windows )
30-pin USB connector cable
Let's begin:

Download iOS 5.0.1 and 5.1.1 firmwares.
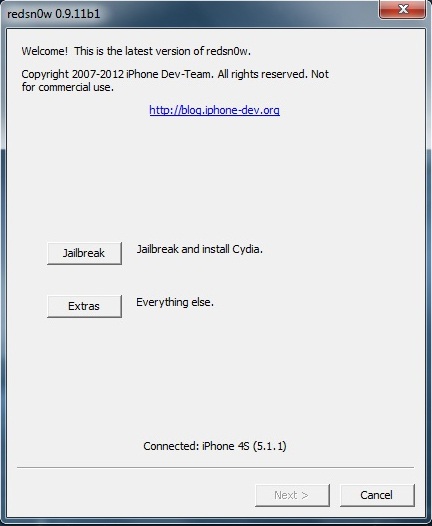
Download and Run Redsn0w 0.9.11 beta 2 ( Mac / Windows ) as administrator.
Connect your iOS device to computer with 30-pin USB connector cable.
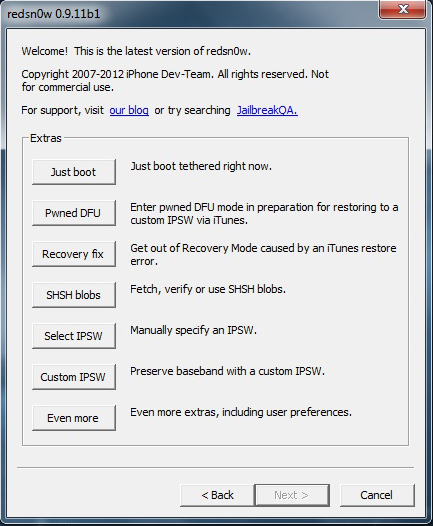
Click Extras.

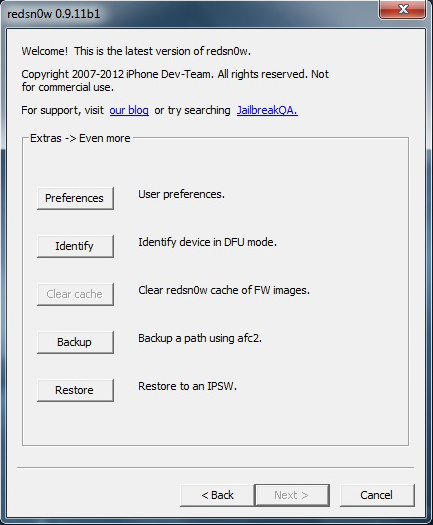
Click Even more.

Click Restore.

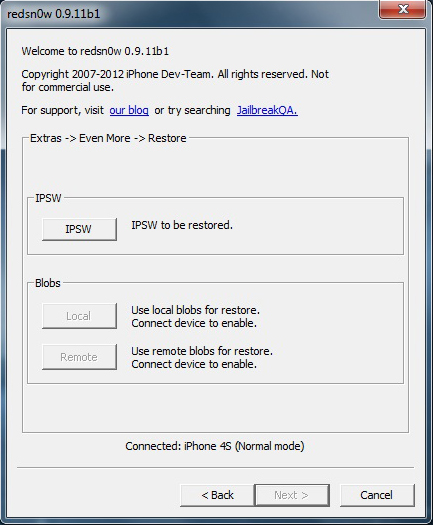
Click IPSW button and select the firmware (iOS 5.0.1) you want to downgrade. Once you locate iOS 5.0.1, Redsn0w will ask you for the latest firmware iOS 5.1.1.

 
Under Blobs section, click Remote if you have jailbroken your iOS device before because Cydia automatically saved your SHSH blobs. Click Local, if you have saved your SHSH blobs on your computer.
Click Next and let Redsn0w do all the jobs.
Done. You've successfully downgraded the iOS.


Monday, June 24, 2013

How to perform Hard Reset on Samsung Galaxy Y


Samsung Galaxy Y Hard Reset

Warning
By performing a hard reset will delete and wipe all of your personal data, so we highly recommended to backup your important data and take the SD Card out from phone before performing hard reset.Samsung Galaxy Y S5360 Hard Reset Procedures :

1. Power off phone
2. Press and hold Home Button ( middle ) + Volume Up + power on button
3. Wait for 5 second until Android System Recovery menu appear
4. There are 4 options

reboot system now
apply update from sdcar
wipe data/factory reset
wipe cache partition
 
5. Move the options to " Wipe data / factory reset " using volume down ( - ) button and menu button to confirm, because the touchscreen doesn't work in reovery mode
 
6. After the process done, phone will reboot.


Sunday, June 16, 2013

How To Downgrade The iOS 7 Beta Back To iOS 6 The Easy Way


Upgrading to iOS 7 is a pretty painless process. All that's required is an Apple Developer account and the time it takes to download the install file. Going back, however, isn't quite so easy.
Unlike instances in the past where upgrading to Apple's new beta OS was a one-way road - which will likely be the case again once iOS 7 is released to the world at large - you can in fact still revert back to iOS 6 if you've upgraded to the iOS 7 beta.
(Read more: How To Download And Install Apple's iOS 7 Beta)
If you're like me, you may have thrown caution to the winds by loading iOS 7 on your iPhone without much more than a vague hope that you could restore it to its prior (and fully functioning) glory. Fortunately, it's a lot easier than various online guides are making it out to be.

Step 1: Download The Proper iOS 6 File

In order to install iOS 6, you must pick the proper version or iTunes will spit an error back at you. For the iPhone 5, you must download iOS 6.1.4. For everything else, it is iOS 6.1.3. If you use the wrong file for your device, iTunes will not allow you to restore it.
To review:
  • For iPhone 5, download iOS 6.1.4. Depending on what cellular carrier you use, you will have to download a different version of iOS 6. Make sure you get the proper one for your network: GSM for AT&T and T-Mobile customers and CDMA for Verizon and Sprint. More info and a full list of worldwide carriers here. 
  • For iPhone 4/4S & iPod Touch 5: download iOS 6.1.3. 

Step 2: Plug The Device Into Your Computer, Cancel The iTunes Automatic Sync Process (If It Starts)

When plugging in your smartphone back into your computer, the iPhone may begin syncing its data with iTunes. This could happen even if you had previously had it set to manual sync. This could be problematic if iTunes tries to make a new backup of your device with iOS 7.
You should cancel the sync just to be safe. While I did not let it happen with my device, having an iOS 7 backup could supersede your old backups and keep you from restoring your phone as it was in iOS 6 with all your content - apps, settings, music, photos - intact. Despite that, you should still be able to, at the very least, setup the device as a new iPhone.

Step 3: Do Not Put Your Device Into DFU Mode, Just Hit Restore

The popular notion when downgrading from iOS 7 to iOS 6 is to put you iPhone into DFU (Download Firmware Update) mode, which is Apple's version of recovery mode for iDevices. It turns out that this is completely unnecessary and your iPhone can be downgraded without that extra effort.
To put your iPhone in DFU mode:
  • Hold down the home and power button for 10 seconds.
  • Release the power button while continuing to hold the home button for eight seconds.
(Read more: Apple's New iOS 7: What You Need To Know Now)
This process sets up your phone automatically for a restore. It is not technically required to downgrade to iOS 6. At the same time, using DFU mode will not have any negative effect on restoring to iOS 6. You can use it if it makes you comfortable.
Once your iPhone is recognized by iTunes, simply hold the Alt/Option button on a Mac or the shift key on a Windows machine and click "Restore iPhone..." The option to choose the iOS6 .ipsw file will pop up, the same way it does when upgrading to iOS 7.
Find the proper file, click it and wait. If you don't hit any annoying road blocks, your device should be back on the iOS 6 train. At this point, choose to restore it from a backup and pick your most recent iOS 6 backup. Hopefully, you made that backup the same day you took the iOS 7 plunge.

A Special Case: iTunes Error 3194

If you run into an error immediately following the process of the restore where iTunes says it's verifying your iPhone's eligibility, you might have simply downloaded the wrong iOS 6 file, noted above.
But if you're absolutely sure you have the right file, then you may just be running into a common iTunes error. Cult of Mac detailed how to fix it.
Here's the step-by-step breakdown:
  • Navigate to the Finder, and select Go in the menu bar
  • Click 'Go to Folder...'
  • Type '/etc' and find the 'hosts' file
  • Copy the 'hosts' file and paste it your desktop, then open it in Text Edit
  • At the very bottom of the file, find a line that reads, “74.208.105.171 gs.apple.com” and delete it
  • Drop that file back into the '/etc' folder, choose replace (your Mac may ask you to authenticate the decision). 
  • Go back to iTunes restore using the methods described above
Let us know in the comments if you successfully downgraded from Apple's newest beta. And don't hesitate to let us know if you used a different method from the one described here to downgrade from iOS 7 to iOS 6.


Friday, June 14, 2013

How to Hack WEP/WPA/WPA2 Wi-Fi Password- wifi hacking software free download


How to Hack WiFi Password (WEP/WPA/WPA2)- Wifi hacking

If you are living nearby someones WiFi hotspot and every time your laptop search for connection its showing up but you don't have passwords. Or you just want to steal someones WPA/WPA2 Wi-Fi hotpots key or passwords. Don't worry...


In this tutorial I’ll show How to hack a WPA/WPA2 Wi-Fi connection through a bootable USB.
Things you should need:

1. A USB pen drive.

2. beini.iso file. [Download it from HERE].

3. UNetbootin software to make your USB drive bootable. [Download for Windows, Linux or Mac]

Some few steps you should to do ( WEP):


1. Write beini.iso on your USB by UNetbootin. Set everything according to this image bellow.


2. After finishing restart your PC and boot it from your USB.


3. If you were successful to boot up then you should see something like this. Click Minidwep-gtk.


4. Click OK.


5. Now Minipwep-gtk program will open. Click Scan.


6. Select a wireless network(should have Clint) from the list. And click Lunch to start creaking process.


7. Sometimes its take a while according to your victim connections IVS value and password strength. So keep passions.


8. If it found a password, it should appear like this.


To creak WPA/WPA2 follow this image instruction.


Let me know if you have done it successfully or you have any complicity.


DOWNLOAD WIFI HACK PASSWORD

(wifi hacking tips)


Thursday, June 13, 2013

iOS 7 Download, Install. 3 Methods. Confirmed.


iOS 7 Download, Install. 3 Methods. Confirmed.
The new iOS 7 system promises over 200 new features. You know how to use iPhone, iPad, and iPod touch from the first time you pick them up.


That’s because the revolutionary Multi‑Touch interface in New iOS 7 was designed for your finger. And the simple, beautiful Home screen is the easiest place to start. From built-in apps to over 1 000 000 more apps and games available on the App Store.

Method 1.(Coming soon)

1) Connect your iPhone/iPod Touch/iPad to your computer running iTunes 11 (download now) or later via USB cable
2) New firmware iOS 7 availability message will appear
3) Hit the “Download and Install” button.
4) It’ll download and install iOS 6 on your iDevice.

Method 2. (Recommended)
1) Download iOS 7 firmware for iPhone/iPad/iPod Touch from the this links –> iOS 7 Download.
2) Open iTunes and connect your iDevice via USB cable
3) Select your device from the left navigation panel on iTunes 11
4) Hold down the Shift (Windows) or Alt/Option (Mac) key and hit the restore button on iTunes
5) Browse and select the downloaded iOS 7 IPSW file. Let the restore process complete.

Method 3. (Coming Soon)

1) Select your device and click “Settings”
2) Click “General”
3) Click “Software Update”
4) Download new iOS 7 


HOW TO IOS 7 DOWNLOAD, INSTALL, LINKS,


IOS 7 DOWNLOAD, INSTALL, LINKS,

How to Update to iOS 7 Download. IOS 7 most advanced mobile OS. With its easy-to-use interface, amazing features, and rock-solid stability, iOS 7 is the foundation of iPhone. And even as others try to catch up, the technologies and features built into iOS 7 keep iPhone years ahead.
Updated.

iOS 7 Beta 1 Download Links (Direct links from Mega):
iPad: coming soon.

iPhone 5 (Model A1428) [Mirror]
iPhone 5 (Model A1429) [Mirror]
iPhone 4S [Mirror]
iPhone 4 (GSM Rev A) [Mirror]
iPhone 4 (GSM) [Mirror]
iPhone 4 (CDMA) [Mirror]
iPod touch (5th generation) [Mirror] 
This is a pre-release version of iOS 7 beta for iPhone and iPod touch. Devices updated to iOS 7 beta can not be restored to earlier versions of iOS.

Evad3rs Jailbreak 6.1.3 iOS 7


EVASI0N JAILBREAK IOS 6 - DOWNLOAD LINKS


EVASI0N DOWNLOAD JAILBREAK IOS 6, 6.0.1, 6.0, 6.1.1, 6.1.2


iOS 6.1.2 / 6.1.1 / 6.1 / 6.0.1 / 6.0 Jailbreak Untethered:

EVASI0N 1.5.3 JAILBREAK DOWNLOAD LINKS

Linux LINK / Mac OS X LINK /Windows LINK


PLEASE SHARE MY SITE WITH YOUR FRIENDS.....It will cost you nothing but huge SUPPORT for me

Copyright Text

Copyrights © 2012 Khulna Store, All Right Reserved
Powered by: Khulna Store