Android-x86 has released the first iso image file of Android Jelly Bean on Christmas Eve available for download. The jb-x86 is based on Android 4.2.1 and this is the first Jelly Bean test release version, so it is possible to see a few bugs here and there. I have tested it on Asus laptop and so far everything seems to work reasonably well, including the WIFI connection. As we expected, Android jb-x86 runs smoother and responsive compared to the AndroVM Jelly Bean.
But bear in mind again, jb-x86 is still under test release stage at the moment. One I problem I had was jb-x86 went unstable and whole system blackout while I was connecting my WIFI access point in the one time Android setup wizard welcome screen. How I bypass it is by skipping it not to connect the WIFI first. Connect the WIFI later manually after I finished the setup wizard.
Here are the steps how to run/install Android Jelly Bean iso:
Download android-x86-4.2-20121225.iso
Download LinuxLive USB Creator (LiLi) and install.
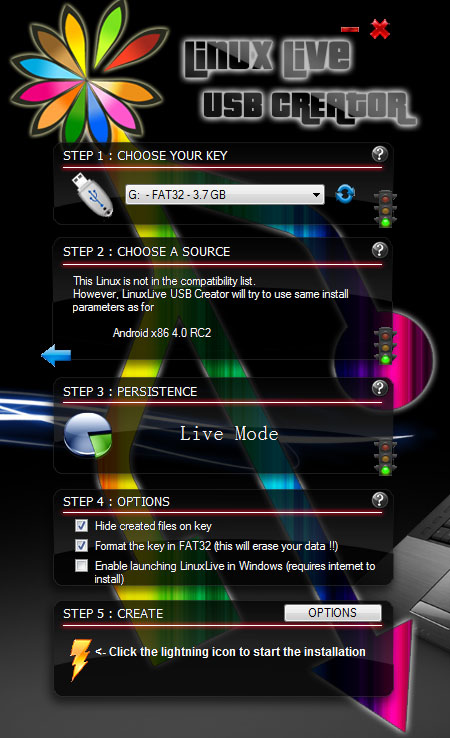
Open LiLi USB Creator and follow the steps below:STEP 1 : CHOOSE YOUR KEY - Select your flash drive.
STEP 2 : CHOOSE A SOURCE - Click on ISO / IMG / ZIP and pick android-x86-4.2-20121225 iso. LiLi will use Android x86 4.0 RC2 install parameters to create.
STEP 3 : PERSISTENCE - Just leave it default.
STEP 4 : OPTIONS - You may check or uncheck the boxes according to your preferences. These will not affect jb-x86 installation.
STEP 5 : CREATE - Click on the lightning icon to start the installation.

Once the installation is done, restart your computer.
Before loading BIOS, choose your flash drive to boot first. Usually by pressing ESC or F10 key, you may have to refer your computer's manual guide.
Try/Install Android Jelly Bean:
Select Live CD - Run Android-x86 without installation to try jb-x86 before your install it. (Strongly recommend you to try the OS first)
Select Installation - Install Android-x86 to harddisk if you wish to install.
For those who choose to install jb-x86 iso:
Partitioning page appears, you may choose an existing partition or create a partition to install jb-x86. You can also install jb-x86 on USB flash drive.
On filesystem page, choose Do not format to avoid the partition from formatting. Otherwise, choose a filesystem type to format.
Select Yes to install boot loader GRUB in order to be able to boot jb-x86.
After installation is completed, Hit Reboot.
Done. Android-x86 4.2.1 Jelly Bean is up and running.
Please read here if you wish to uninstall Android-x86 and GRUB Loader.
But bear in mind again, jb-x86 is still under test release stage at the moment. One I problem I had was jb-x86 went unstable and whole system blackout while I was connecting my WIFI access point in the one time Android setup wizard welcome screen. How I bypass it is by skipping it not to connect the WIFI first. Connect the WIFI later manually after I finished the setup wizard.
Here are the steps how to run/install Android Jelly Bean iso:
Download android-x86-4.2-20121225.iso
Download LinuxLive USB Creator (LiLi) and install.
Open LiLi USB Creator and follow the steps below:STEP 1 : CHOOSE YOUR KEY - Select your flash drive.
STEP 2 : CHOOSE A SOURCE - Click on ISO / IMG / ZIP and pick android-x86-4.2-20121225 iso. LiLi will use Android x86 4.0 RC2 install parameters to create.
STEP 3 : PERSISTENCE - Just leave it default.
STEP 4 : OPTIONS - You may check or uncheck the boxes according to your preferences. These will not affect jb-x86 installation.
STEP 5 : CREATE - Click on the lightning icon to start the installation.

Once the installation is done, restart your computer.
Before loading BIOS, choose your flash drive to boot first. Usually by pressing ESC or F10 key, you may have to refer your computer's manual guide.
Try/Install Android Jelly Bean:
Select Live CD - Run Android-x86 without installation to try jb-x86 before your install it. (Strongly recommend you to try the OS first)
Select Installation - Install Android-x86 to harddisk if you wish to install.
For those who choose to install jb-x86 iso:
Partitioning page appears, you may choose an existing partition or create a partition to install jb-x86. You can also install jb-x86 on USB flash drive.
On filesystem page, choose Do not format to avoid the partition from formatting. Otherwise, choose a filesystem type to format.
Select Yes to install boot loader GRUB in order to be able to boot jb-x86.
After installation is completed, Hit Reboot.
Done. Android-x86 4.2.1 Jelly Bean is up and running.
Please read here if you wish to uninstall Android-x86 and GRUB Loader.
